Expo iOS Build Failing with OneSignal? Here’s the Fix

When picking a tech stack for developing cross platform mobile applications, it becomes difficult to ignore Expo. Expo provides developers with a framework, built on top of React Native, for building apps for both Android and iOS. EAS (Expo Application Services) gives developers access to cloud-based build and deployment tools that handle much of the process for you, such as configuring and managing native code. This means developers can build apps for both platforms regardless of their machine's OS.
It is standard practice to add Push Notifications to mobile applications in order to inform and engage users. There are many tools out there that help with this, however, you will find that many of these solutions require "ejecting" the application from Expo. Ejecting from Expo means losing many of the conveniences provided by EAS, as you are now responsible for managing your app's native configuration and builds yourself. Thankfully, one tool exists that uses its own SDK in order to work seamlessly with EAS.
OneSignal is a powerful service, allowing you to deliver custom push notification to your mobile app users, along with various other customer engagement tools. And, best of all, OneSignal does not require you to eject your app from Expo during setup.
The Problem: iOS Build Fails with OneSignal
OneSignal provides documentation for setting up and configuring Push Notifications. These docs guide you through creating your app on OneSignal, adding and initializing the SDK as well configuring for both Android and iOS. However, after following the documentation and attempting an iOS build with EAS you will likely see the following error, causing your build to fail.
Setting up credentials for target OneSignalNotificationServiceExtension (com.company.myapp.OneSignalNotificationServiceExtension)
Distribution Certificate is not validated for non-interactive builds.
Failed to set up credentials.
The OneSignalNotificationServiceExtension is needed in order to get the most out of Push Notifications on iOS, and is automatically added by the Expo SDK during the build process. It is a separate module from your main application, meaning it requires some additional configuration that the OneSignal documentation linked above fails to mention.
Step 1: Enable Capabilities in Apple Developer
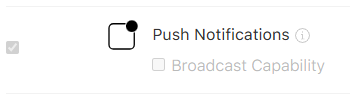
First, ensure that you have followed the documentation provided by OneSignal. In order for Expo to have access to the necessary credentials, we need to make some updates to the project configuration in Apple Developer. At this point you should already have an identifier for your main app (com.company.myapp). From the list of identifiers, click on your app's identifier and under Capabilities, make sure both the Push Notifications and App Groups capabilities are enabled. Push Notifications must be enabled to provide the required entitlements for delivering notifications to user devices, and App Groups must be enabled to link the main application with the OneSignal extension.

Step 2: Create an App Group
App Groups allow the main app and the OneSignal extension to securely share data — without this, notifications won’t work correctly. An App Group can be added by clicking the (+) add button on the top left of the Identifiers page, and then selecting "App Groups" When creating the App Group, you should prefix your bundle identifier with "group." and suffix it with ".onesignal" resulting in group.com.company.myapp.onesignal for this example. This should also match what you added to the iOS entitlements section in app.json/app.config.js while following the OneSignal documentation.
"com.apple.security.application-groups":["group.${ios.bundleIdentifier}.onesignal"]
Step 3: Add a New Identifier for the OneSignal Extension
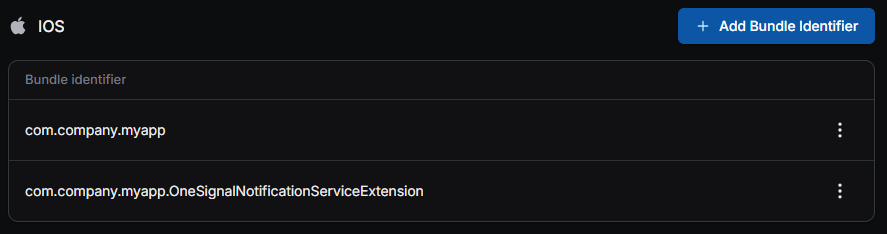
We now also need to add a new Identifier for the OneSignal extension (com.company.myapp.OneSignalNotificationServiceExtension). For this Identifier we do NOT need Push Notification capabilities as the extension itself doesn’t send notifications — it relies on the main app’s entitlements. It only needs App Groups so it can access shared data.
Step 4: Create New Provisioning Profiles
Making the above updates results in any provisioning profiles you established previously becoming invalid. As a result we need to make a new provisioning profile for our main app. We also need to make a provisioning profile for the OneSignal extension. After creating these in the Profiles page on Apple Developer, go ahead and download both provisioning profiles.
Step 5: Upload Credentials to Expo
Next, we'll need to provide these new credentials in Expo. In your project on Expo, go to the credentials page. Under the iOS section, either edit your main app bundle identifier or add one if its not there. Here we want to add the newly created provisioning profile under Build Credentials. We also want to add our Push Key under Service Credentials, this is the same Push Key you added during the iOS setup portion of the OneSignal docs. Back under project credentials, we want to add another bundle identifier for the OneSignal extension (com.company.myapp.OneSignalNotificationServiceExtension) and provide it with the corresponding provisioning profile. This bundle identifier does not need the Push Key as that is handled by the main app.
After making these adjustments and rerunning your iOS build on EAS, you should see that, now with access to the necessary credentials, your build is successful!
Conclusion
The missing step in OneSignal’s setup is configuring App Groups and creating provisioning profiles for the notification extension. Once added to Expo, EAS builds succeed and you can finally leverage OneSignal ’s full notification and engagement toolkit.