Kubevirt Up and Running (and a Windows VM)


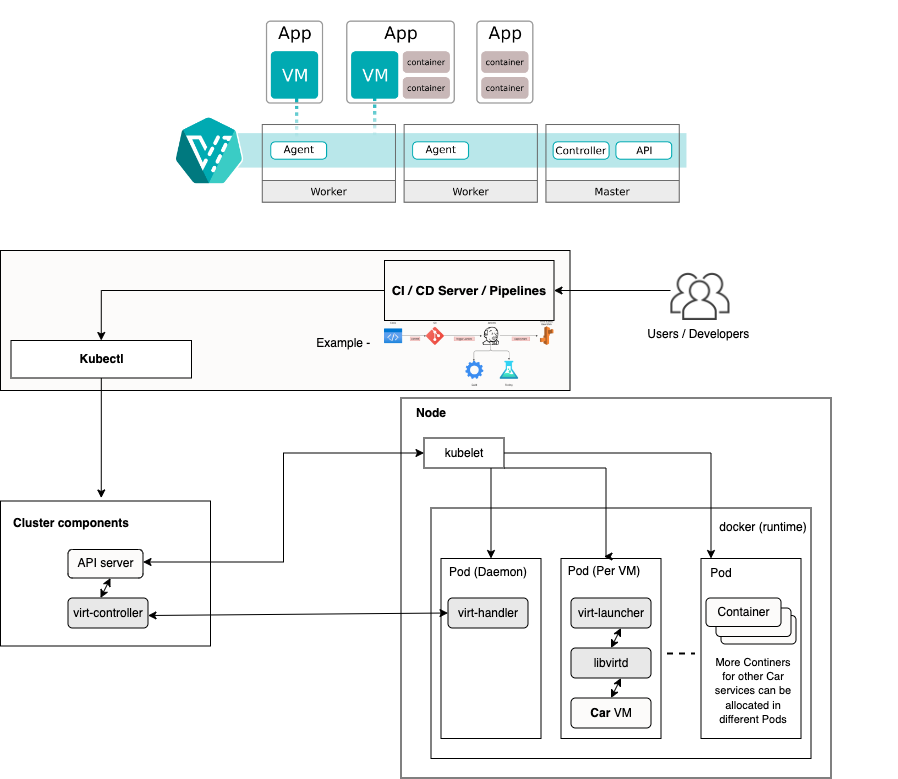
As container technology continues to advance, Virtual Machines are following suit. Hyperconverged infrastructure is becoming incredibly useful, not only for providing a stop gap for migrating legacy workloads, but also for creating familiar and secure environments. Operators of virtual machines and containers alike now have many methods and tools to manage these machines, in ways that are most useful for their workflows. Kubevirt is unlocking new virtual machine resiliency, efficiency, and automation capabilities previously monopolized by the major hypervisors.
While the documentation is continuing to improve, it is still challenging to understand some of the fundamental steps for managing VMs with Kubevirt (especially if you're new-ish to kubernetes).
In this technical guide, we will walk through deployment of kubevirt, and a Windows Server 2022 virtual machine, to help you understand the basic workflows and components and get your first VMs up and running.
Warning: This assumes some basic experience with linux and kubernetes, and is not meant to be exhaustive.
Preparing the host machine
Note: Here are the Kubevirt docs, in case you need to view or troubleshoot something in more depth.
Source files for the manifests in this guide can be found in this repository (WIP):
BIOS
Make sure the host machine has virtualization features enabled. Explaining each variation is out of scope of this document. Read the Manual!
Bonus: WSL
If you happen to be trying this on WSL (what I use regularly), then depending on your version of WSL, you may need to do a little bit of extra prep to enable nested virtualization.
Set-VMProcessor -VMName <YourWSL2DistroName> -ExposeVirtualizationExtensions $true
[wsl2]
nestedVirtualization=true
Preparing the distribution
Install k3s
Grab the install script for k3s from the quickstart here: https://docs.k3s.io/quick-start
Ok fine, I'm lazy too. Here it is:
curl -sfL https://get.k3s.io | sh -The k3s install will essentially include everything you need. For example, I did not need to install Docker.
Check the installation with a simple kubectl command such as kubectl get pods -A
If you're having trouble with kubectl or kubeconfig file access, check the troubleshooting section at the end.
You may also want to make sure you're communicating with the right cluster, by inspecting kubectl config get-contexts. Most folks will only have one option listed. Those who have multiple will know what to do. (hint: kubectl config use-context [distro])
Prepare virtualization dependencies
Within your linux distribution, install the necessary packages for KVM and QEMU. For Ubuntu-based distros, use:
sudo apt update
sudo apt install qemu-kvm libvirt-daemon-system libvirt-clients bridge-utils virt-manager
Check for virtualization and qemu compatibility with this handy command:
virt-host-validate qemuYou may encounter errors such as the below:
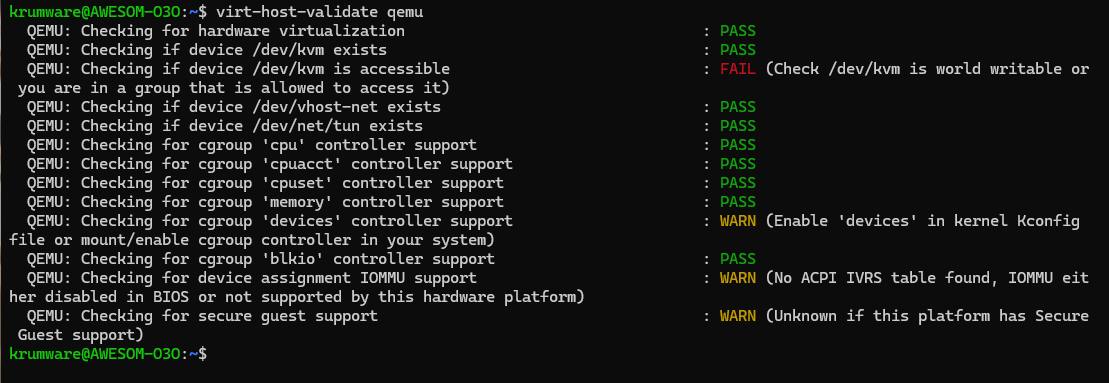
In my case, the error displayed was not critical. But others may be, such as:
QEMU: Checking if device /dev/kvm exists : FAIL (Check that the 'kvm-intel' or 'kvm-amd' modules are loaded & the BIOS has enabled virtualization)
To grant your user permission to access /dev/kvm, add your user to the kvm group:
sudo adduser $USER kvm
Then check kvm specifically using this command:
kvm-ok
You can follow the hint provided by the output:
INFO: /dev/kvm does not exist
HINT: sudo modprobe kvm_amd
INFO: Your CPU supports KVM extensions
KVM acceleration can be used
After applying the command, things should be working.
$ sudo modprobe kvm_amd
INFO: /dev/kvm exists
KVM acceleration can be used
Install KubeVirt
Now the fun begins, and so we need to install the kubevirt operator. The official guide is here: https://kubevirt.io/user-guide/cluster_admin/installation/#installing-kubevirt-on-kubernetes
The steps are as follows:
- Query for the latest stable release
# Point at latest release
$ export RELEASE=$(curl https://storage.googleapis.com/kubevirt-prow/release/kubevirt/kubevirt/stable.txt)- Add the manifests for the operator.
# Deploy the KubeVirt operator
$ kubectl apply -f https://github.com/kubevirt/kubevirt/releases/download/${RELEASE}/kubevirt-operator.yaml
You can check the workloads it creates with kubectl get pods -n kubevirt
And the output should look similar to these:
kubevirt virt-operator-7b7bbf7c6f-ckdlk 0/1 Running 0 9s
kubevirt virt-operator-7b7bbf7c6f-gx2pm 0/1 Running 0 9s
- Next, add the actual kubevirt configuration, which will spin up additional workloads.
# Create the KubeVirt CR (instance deployment request) which triggers the actual installation
$ kubectl apply -f https://github.com/kubevirt/kubevirt/releases/download/${RELEASE}/kubevirt-cr.yaml
You can use the below command to check the status, but you may also just continue to ping with kubectl get pods -n kubevirt
# wait until all KubeVirt components are up
$ kubectl -n kubevirt wait kv kubevirt --for condition=Available
Prepare the Client (cli)
Install virtctl, a convenient command line tool for working with kubevirt and the VMs.
Several methods are documented here: https://kubevirt.io/user-guide/user_workloads/virtctl_client_tool/
I personally used Brew to install.
brew install virtctlPrepare a basic VM example
Now that we've installed the components , let's run a basic virtual machine, to verify that our host and its kubernetes workloads are ready.
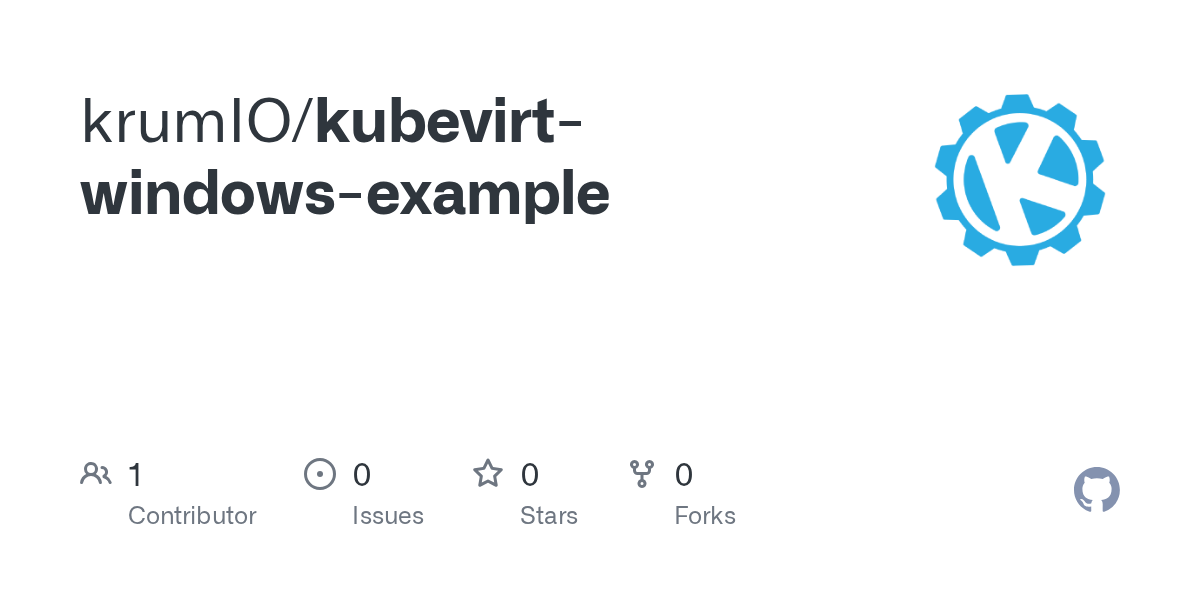
For convenience, clone the example repository
git clone https://www.github.com/krumIO/kubevirt-windows-example.gitNext, create the VirtualMachine resource by applying the basic example's Virtual Machine manifest.
kubectl apply -f ./examples/basic/1_vm.yaml

-or for the lazy-

kubectl apply -f https://raw.githubusercontent.com/krumIO/kubevirt-windows-example/refs/heads/main/examples/basic/1_vm.yaml
Verify the VM was created properly
kubectl get vms
kubectl get vms -o yaml testvm
By default the VM will be stopped. Let's start it using our handy virtctl
virtctl start testvmFinally, connect to the VM using virtctl. There are default usernames and passwords embedded in the console connection resulting from:
virtctl console testvmIf you're able to interact with the VM, everything should be good to go.
Windows VM prep
Now, onto Windows. This example will be focused on running the Windows Server 2022 installer. We will cover a windows snapshot, or a preprepared and bootable windows distribution in followup. Focusing on the installer will help you understand the components of Kubevirt.
- Start by downloading the Windows Server 2022 image from https://www.microsoft.com/en-us/evalcenter/download-windows-server-2022
Or use this handy wget:
wget -O windows-server-2022.iso https://go.microsoft.com/fwlink/p/?LinkID=2195280&clcid=0x409&culture=en-us&country=US- Next, in order to upload the image into our kubevirt system, we need to install the Containerized Data Importer. This tool is not necessarily required, but is very convenient.
The installation has a similar feel to the other kubevirt components:
export VERSION=$(basename $(curl -s -w %{redirect_url} https://github.com/kubevirt/containerized-data-importer/releases/latest))
kubectl create -f https://github.com/kubevirt/containerized-data-importer/releases/download/$VERSION/cdi-operator.yaml
kubectl create -f https://github.com/kubevirt/containerized-data-importer/releases/download/$VERSION/cdi-cr.yaml- Now, like any kubernetes workload, the workloads/APIs will not be accessible as they're inside the self-contained cluster network. The CDI service must be made accessible, either by accessing it from the same host, or by exposing a Service, Ingress, Route, or kubectl portforward. More info here: https://kubevirt.io/user-guide/storage/containerized_data_importer/#expose-cdi-uploadproxy-service
We'll add a Service to create a NodePort (open a port on the host machine).
kubectl apply -f ./examples/windows_server_2022/cdi-uploadproxy-nodeport.yaml

-or for the lazy-

kubectl apply -f https://raw.githubusercontent.com/krumIO/kubevirt-windows-example/refs/heads/main/examples/windows_server_2022/cdi-uploadproxy-nodeport.yaml- Next, we need to create the DataVolume and upload the image using the virtctl CLI. This part of the process can get tricky depending on the form of storage being used. The below example was performed without specifying a particular storage class, and where
local-pathwas the default storage class.
virtctl image-upload dv windows-installer-2022 --access-mode=ReadWriteOnce --force-bind --size=10Gi --uploadproxy-url=https://127.0.0.1:30085 --insecure --image-path=./windows-server-2022.isoNotice the --uploadproxy-url=https://127.0.0.1:30085. That's the NodePort we opened with the kubernetes service resource. More info on the use of --force-bind is in the troubleshooting notes at the end.
- Now we need a root volume to install windows to. I've prepared one here:
kubectl apply -f ./examples/windows_server_2022/windows-installer-storage.yaml

-or for the lazy-

kubectl apply -f https://github.com/krumIO/kubevirt-windows-example/blob/main/examples/windows_server_2022/windows-installer-storage.yaml- Next, apply the VirtualMachine definition.
kubectl apply -f ./examples/windows_server_2022/windows-vm.yaml

-or for the lazy-

kubectl apply -f https://github.com/krumIO/kubevirt-windows-example/blob/main/examples/windows_server_2022/windows-vm.yaml
Now, for extra info, I want to explain the volumes seen in the definition (comments in-line):
      volumes:
      # First is the cdrom disk. This will be a ReadOnly disk that maps to the DataVolume for the installer image that we uploaded.
      - name: cdrom-disk
        persistentVolumeClaim:
          claimName: windows-installer-2022
      # Next is the data volume. We made this 32Gb by adding the PersistentVolumeClaim of the same name (or the windows-installer-storage.yaml)
      # This will appear in the installer as the install destination - after we install the virtio storage drivers.
      - name: rootdisk
        persistentVolumeClaim:
          claimName: windows-server-2022-data
      # Hyperconverged in action. Here we mount a container image which functions as a storage volume for the virtio drivers. This is also a great example of a way to share filesystems between your Windows machine and container workloads.
      - containerDisk:
          image: registry.suse.com/suse/vmdp/vmdp:2.5.4.3
        name: virtio-container-disk
7. Like we did in the basic example, start the VM using virtctl: virtctl start windows-server-2022-vm
- Monitor the status with
kubectl get vms -A - Once the machine is running, you can launch a VNC viewer using:
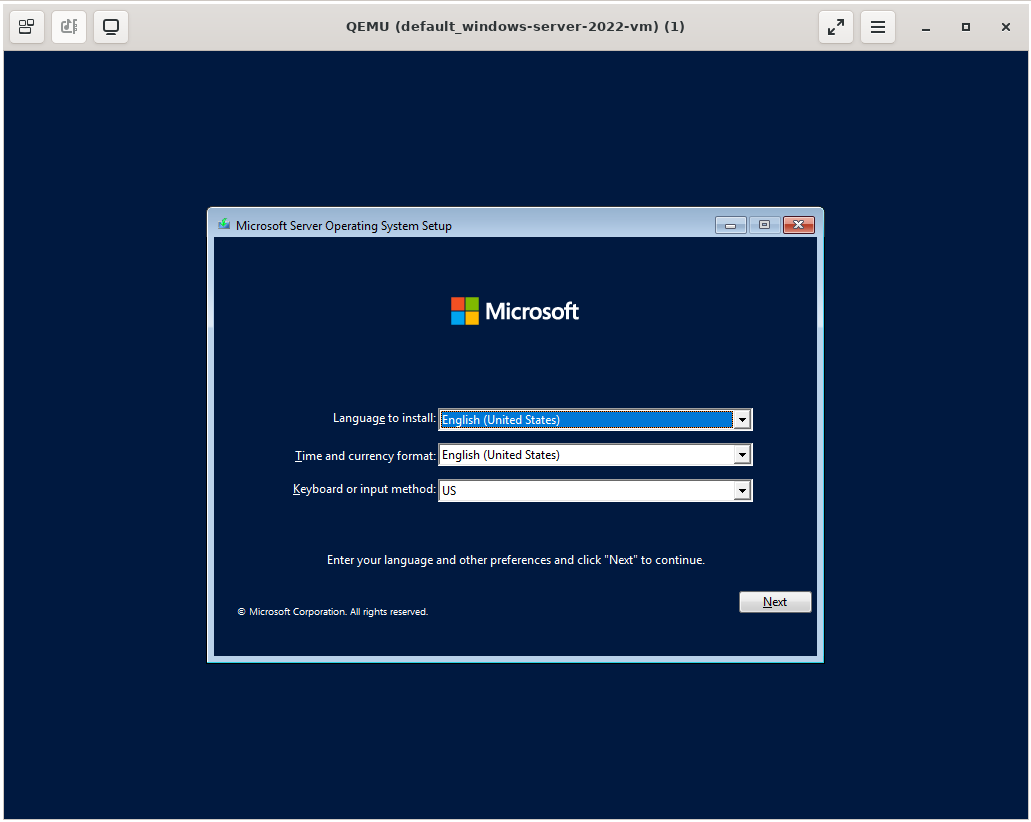
virtctl vnc windows-server-2022-vm
Note: you may need to install a viewer. I used sudo apt install virt-viewer
The machine will load and show the windows installer.
- Run through the installation like you normally would. For more information about the install process, and mounting the virtio drivers, see the SUSE Harvester documentation for great screenshots: https://docs.harvesterhci.io/v1.1/vm/create-windows-vm/#installation-of-windows
In a future guide we will cover snapshots and replication.
Troubleshooting
No bootable device

I did experience an issue where the machine could not boot. What happened was the contents of the persistent volume claim for the install disk had not actually been successfully uploaded (or imported/downloaded). This also led to introducing the --force-bind option during the upload, and before running the VM. Some storage providers (like PortWorx) actually recommend a form of this flag to enable VM migration from other providers.
Sometimes this can also be caused by not allocating enough space for the data, which can fail silently:
PV for kubevirt not getting created when PVC datasource is VolumeUploadSource
by u/anas0001 in openshift
Check your Storage Classes!
A common mistake that is made in many single-node clusters is related to an amazing tool - Longhorn https://longhorn.io/
By default, Longhorn's storage driver will prefer 3 replicas on each volume. Unfortunately, if you are testing things out on a single node, it will never have 2, let alone 3 replicas. These volumes will be marked as Degraded and can prevent your workloads from operating (it's a feature, not a bug).
To work around this, you need to create a storage class which targets 1 replica (or at most as many nodes for the cluster). See the following page for help:
For example, in the manifest supplied by the documentation, change
parameters:
  numberOfReplicas: "3"
to
parameters:
  numberOfReplicas: "1"
It's also possible to use the Longhorn UI or CLI to adjust the replica requirement for existing volumes, to resolve those issues. But I'd recommend just creating a non-default option called longhorn-no-replicas and intentionally using that in both recreated and new volumes.
The better solution, of course, is to have at least 3 nodes in your cluster. But who cares about uptime anyways? (brb, adding more nodes)
k3s troubleshooting
export KUBECONFIG=~/.kube/config

# Create the .kube directory if it doesn't already exist
mkdir -p ~/.kube

# Copy the raw configuration content to the local kubeconfig file
sudo k3s kubectl config view --raw > "$KUBECONFIG"

# Secure the file by setting permissions
chmod 600 "$KUBECONFIG"
Additional reading
I really appreciated this article from Charles Lo, to help take your understanding of some of these possibilities to the next level. Give it a read!